
Carton Packaging Machinery: Stitching vs. Gluing for Heavy-Duty Boxes
Choose gluing when the actual board surface supports a reliable bond and the machine provides enough compression time before the joint is handled. Choose stitching when mechanical fastening better suits thick board, difficult bonding surfaces, or a production mix that makes adhesive control unreliable. Heavy-duty corrugated boxes do not automatically require wire: a properly formed glued joint can perform well, while poorly positioned stitches can tear through the liner.
The decision starts with the manufacturer’s joint, where the joining flap connects the box body. Box weight alone does not define the load on this seam. Outward pressure from the contents, handling impacts, moisture exposure, and box geometry all affect its performance. When evaluating packaging machinery for cartons, establish these conditions before comparing production speeds.
Separate joint failure from box failure
A collapsed box does not necessarily indicate an inadequate joining method. Panel buckling, crushed flutes, damaged scores, and moisture-weakened board can cause failure while the manufacturer’s joint remains intact. Changing from glue to wire will not correct insufficient board compression strength or poor pallet support.
Examine where damage begins. A seam opening at the adhesive interface suggests a bonding problem. Liner tearing around stitch legs points toward concentrated loading, unsuitable stitch geometry, or weakened paper. If the joint remains closed while adjacent panels buckle, investigate the board specification and converting process before changing machinery.
Also distinguish shear from peel. An overlapping joint distributes shear across its bonded area, but an exposed flap edge can introduce peel when a distorted box pulls the seam apart. Stitching transfers forces through discrete fasteners and the surrounding board. Neither mechanism can be assessed properly without reproducing the seam’s orientation and loading in the assembled box.
Where stitching and gluing change the decision
These conditions establish a shortlist, not a strength ranking. A machine that handles the nominal board thickness can still struggle with warped blanks, a narrow joining flap, or material variation. Trials need to include the difficult combinations within the intended production range.
Gluing depends on the surface and the time available
For gluing, specify the surface that actually receives adhesive. An unprinted paper liner, a heavily printed flap, and a moisture-resistant coating present different bonding conditions even when the underlying board grade is identical. Recycled content alone does not determine bondability; surface treatment, dust, absorbency, and liner strength also influence the result.
Water-based adhesives require suitable wetting and enough water removal or absorption to develop handling strength. Excess application can soften the liner locally and delay setting. Too little adhesive, an interrupted bead, or premature drying before the surfaces meet leaves an incomplete bond. A cold, damp blank can behave differently from material conditioned in the production area.
Hot-melt systems introduce a different process window. Application temperature, adhesive viscosity, open time, and cooling conditions must match the distance between application and compression. If the adhesive sets before contact, increasing compression pressure will not restore proper wetting. Service temperature also matters: evaluate resistance to creep under the expected load and heat exposure.
Compression length must be assessed together with running speed. Contact time is approximately the effective compression travel divided by belt speed. A higher speed shortens that time unless the machine provides additional compression length. Pressure should hold the surfaces together while the bond develops; excessive force can crush flutes and compromise the box.
Ask for glue-pattern verification on opened trial joints. Continuous coverage, placement within the overlap, and consistent contact are more useful than observing adhesive at the nozzle. Fiber tear after curing supports evidence of bonding, but it is not a complete acceptance criterion: weak liners can tear under relatively low loads.
Stitch quality is defined by the formed fastener
A stitching machine must drive and form wire through the specified board construction without cutting away the material that carries the load. Relevant settings include wire cross-section, crown width, leg length, stitch spacing, and clinch geometry. Wire compatibility should follow the stitching head’s specification; changing wire to address a problem can create feeding, cutting, or forming faults elsewhere.
Inspect both sides of the joint. The crown should sit securely without excessively cutting or crushing the outer liner. The legs need adequate penetration and a controlled clinch, with no hazardous projection. An apparently neat crown can conceal poorly formed legs underneath, especially when board thickness changes between orders.
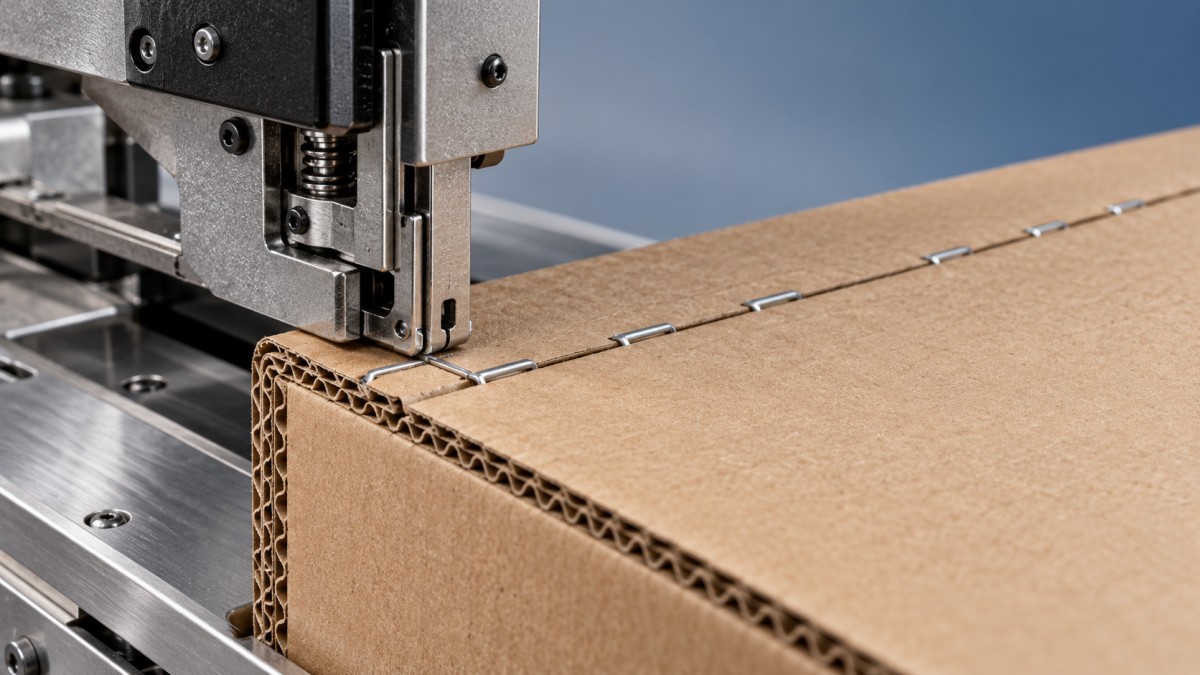
Edge distance and overlap geometry deserve particular attention. Stitches placed too close to a flap edge leave little paper to resist tear-out. Increasing stitch count does not necessarily solve this problem: closely spaced penetrations can weaken the liner along a line. Establish placement through joint testing rather than assuming that more wire produces a stronger seam.
Board caliper variation affects how the legs form. A setting that works on a flat sample can produce loose fastening on thinner sections or excessive crushing on thicker ones. Warped blanks also disturb registration and support beneath the head. Trial runs should therefore include representative material variation, not only carefully selected flat sheets.
For damp storage or demanding transport, assess wire finish and corrosion resistance against the expected exposure. Stitching does not make a moisture-weakened liner immune to tearing. Where metal contact with the packed product is unacceptable, the fastening method needs to be resolved before machine capacity is compared.
Machine architecture can outweigh the joining method
The rated joining speed says little about the finished-box rate unless feeding, folding, alignment, and discharge remain stable. Large blanks need controlled support through the machine. A stitching or gluing unit cannot compensate for folds that produce an uneven overlap or a box body that is out of square.
Evaluate the complete size envelope, including blank dimensions, folded dimensions, flap width, and access around the seam. Double-wall and triple-wall descriptions do not define a single thickness. Obtain the usable caliper range and confirm it against production samples, including score buildup and local thickness at the overlap.
For gluing equipment, compare adhesive delivery stability, nozzle access, compression adjustment, and the ability to detect missing application. For stitching equipment, examine head access, wire-feed control, clincher adjustment, and detection of missed or malformed stitches. A detection function has practical value only when it identifies the relevant defect and supports a reliable stop or rejection response.
On short runs, setup repeatability can matter more than maximum speed. Stored recipes help only when mechanical positions and material conditions can be reproduced. Record changeover time through to the first acceptable box, including trial blanks and corrections. For wide or awkward blanks, include feeding and handling requirements in the trial.
Use a trial that exposes the process limits
A useful comparison begins with matched blanks from the intended board specification. Record moisture condition, surface treatment, caliper, joint dimensions, and machine settings. Compare production-ready joints after the appropriate adhesive conditioning period, while separately testing whether glued boxes survive the immediate handling sequence.
The trial should address three distinct questions:
- Does the seam resist its expected load? Joint tests should reproduce relevant shear or opening forces, with failure location recorded alongside the measured result.
- Complete boxes need compression and distribution testing appropriate to their contents, stacking arrangement, and transport conditions. A strong seam cannot compensate for unstable panels or unsuitable internal support.
- Process stability requires a sustained run covering starts, stops, material replenishment, and normal blank variation. Samples collected only after prolonged adjustment conceal startup waste and sensitivity to interruptions.
Condition samples to reflect credible storage and transport exposure. Humidity changes board strength and dimensions; temperature affects adhesive behavior. Test the assembled package where contents influence bulging or load transfer. An empty-box trial alone will miss these interactions.
After failure, preserve and photograph the joint. Adhesive remaining mainly on one surface suggests a different problem from cohesive splitting within the adhesive layer. Paper tearing around stitch holes differs from a fastener opening or pulling free. These distinctions identify whether the correction belongs in materials, settings, seam geometry, or machine capability.
Compare cost per accepted box
Consumable prices are only part of the operating comparison. Glue consumption depends on application geometry and transfer efficiency; wire usage depends on stitch count and formed length. Both processes also consume blanks during setup, stoppages, and defect correction. Calculate cost against accepted output over a representative production mix.
Maintenance demands differ. Adhesive systems need clean delivery paths, controlled application, and procedures suited to the adhesive type. Stitching systems need attention to feed components, cutters, forming parts, and clinchers. Compare maintenance access, wear-part replacement time, and the availability of the skills required to restore a stable process.
Combined stitching-and-gluing capability is justified when distinct box specifications require both methods or a validated seam design uses them together. It adds settings, maintenance, and potential bottlenecks. Treat it as a production requirement to demonstrate, rather than an automatic upgrade.
Machine acceptance criteria should state the board range, approved joint geometry, acceptable defects, sustained output, changeover conditions, and required package performance. The decisive evidence is a repeatable seam on representative material, followed through the handling and environmental conditions the finished box must survive.
Related News
Get weekly intelligence in your inbox.
No noise. No sponsored content. Pure intelligence.